How to Make Animated LINE Stickers with AI in 2026: A Step-by-Step Guide
Turn one photo into a complete sticker pack using ChatGPT, Seedance, and a reusable skill—with copyable prompts for every stage.
Your dog has a perfect “this meeting could have been an email” expression. You want to turn it into a sticker—and then a whole set you can actually send in a chat.
This guide walks through that process: plan eight reactions, create a consistent character, animate the artwork, remove the background, and prepare files for LINE. You’ll use ChatGPT for the artwork, Seedance for movement, and a coding assistant for the repetitive file work.
We’ll follow one example throughout: an office Shiba sticker pack, based on your own photo, with eight everyday reactions and no captions. Replace the cat and theme with your own. The prompts below are original starting templates; inspect and adjust the generated results as you go.
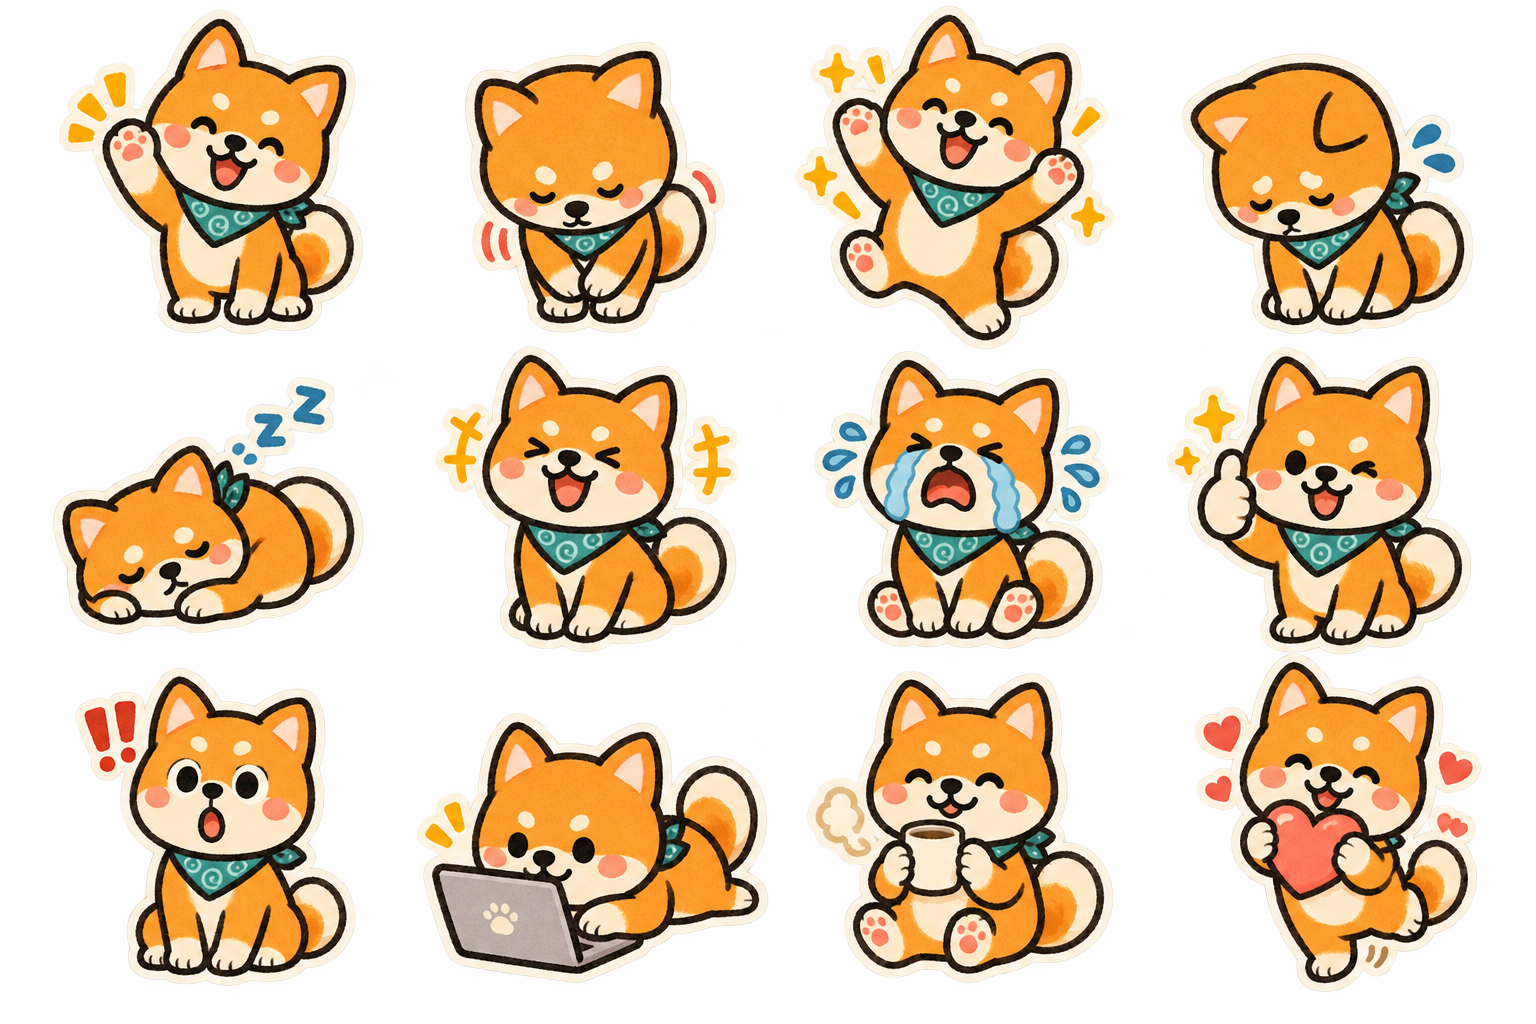
Our existing Shiba sticker artwork provides the visual reference for this guide. The sheet shows 12 reactions; we’ll plan an eight-sticker selection below. This is a static illustration with a background, rather than a finished transparent LINE export.
What you’ll need
- A clear photo you have permission to use. Choose one where the face and distinctive features are visible.
- ChatGPT with image generation available in your account.
- Access to Seedance through a service that offers image-to-video generation.
- A local coding assistant such as Codex or Claude Code that can read files and run image-processing code.
- A LINE Creators Market account when you’re ready to submit the pack.
Image and video generation may cost money. Check the service’s current price before starting, and allow for a few retries. We won’t assume a particular subscription, promotion, or Seedance version.
The workflow is photo → character → eight static stickers → short animations → transparent files → LINE submission. If you only want static stickers, you can stop before the animation stage and prepare a static submission instead.
Step 1: Choose eight reactions people will actually use
Start with the conversation. Who will send these stickers, and what will they be trying to say?
“A cute Shiba” gives you a character. “A tired office Shiba reacting to the workday” gives you a reason to use it. For our example, the pack plan looks like this:
| Sticker | Meaning | One simple movement |
|---|---|---|
| 01 | Good morning | Raise a paw and wave |
| 02 | Got it | Lift a paw in a thumbs-up gesture |
| 03 | Thank you | Bow and return upright |
| 04 | Working on it | Tap at a keyboard |
| 05 | Need a break | Lift a warm mug and pause |
| 06 | Sorry | Lower the ears and bow the head |
| 07 | We did it | Lift both paws in celebration |
| 08 | Good night | Close the eyes and settle down |
Use this prompt in ChatGPT to make your own plan:
Plan an 8-sticker pack based on the attached photo.
Theme: a tired but lovable office Shiba.
Audience: coworkers chatting about everyday work.

For each sticker, give me:
- a two-digit ID;
- the message it communicates without written text;
- a clearly readable still pose;
- one short, simple animation idea.

Make the reactions distinct and useful in conversation.
Keep props minimal. Avoid actions that need a scene change.
Return a table. Do not generate images yet.
Read the table before generating anything. If three reactions all mean “happy,” replace two with something more useful. Save the final table as plan.md.
Step 2: Turn your photo into a character
Upload your photo to an image-capable ChatGPT conversation and ask for one character first. Approving the face, colors, and proportions now gives you a reference for the rest of the pack. See the official image-generation documentation for supported image workflows.
Create a sticker character based on my attached dog photo.
Keep its recognizable fur markings, ear shape, and eye color.

Style: simple hand-drawn illustration, rounded shapes,
clear facial expression, a small color palette, and clean edges.
Show one full-body character in a neutral standing pose.
Keep the paws, ears, and tail completely inside the image.
Use a transparent background if available.
No text, logo, border, sticker cutline, or surrounding scene.

This image will be the reference for a matching sticker pack.
Look for the details that make the character yours. Count the limbs, check the markings, and look at the face at a small size. Ask for a targeted correction if necessary: “Keep everything else the same, but restore the white patch on the left ear.”
Save the approved image as character.png. A checkerboard drawn into an image is not transparency; we’ll check the actual file later.
Step 3: Generate and separate the static stickers
Attach the approved character and use the eight-reaction plan to create a sheet. A sheet makes it easier to compare the set together, but you still need to check each pose for consistency.
Using the attached character as the visual reference, create
one sheet of 8 stickers arranged in 2 rows and 4 columns.
Use the 8 poses from our approved plan, in reading order.

Preserve the character's markings, colors, proportions,
and illustration style across every pose.
Keep each character entirely inside its own area, with generous
empty space between neighbors. Leave room around ears and paws.
Keep the apparent character size similar throughout the set.
No captions, labels, grid lines, decorative frames, or scenery.
Use a transparent background if available.
In the Shiba artwork above, the teal bandana, orange coat, cream muzzle, and rounded features make the character recognizable across the reactions. Use those same visual anchors when checking your generated sheet. For this eight-sticker example, choose the wave, thumbs-up, bow, keyboard, mug, apologetic pose, celebration, and sleeping pose.
Save the sheet as sheet.png. Open a working folder in your coding assistant and place plan.md, character.png, and sheet.png inside it. Then ask:
Read plan.md and inspect sheet.png. Separate the eight stickers
into refs/01.png through refs/08.png in the planned order.

Use the visible artwork and spacing to find each sticker.
Do not assume the generated grid is perfectly evenly spaced.
Keep detached details, such as paws or props, with their character.
Do not cut off the artwork or rescale every pose independently.

Check whether the input has a real alpha channel. If it has a
solid background, remove it without deleting matching colors
inside the character. Flag ambiguous areas for inspection.

Create a numbered contact sheet on light and dark backgrounds
so I can inspect the crops and edges. Preserve the source file.
Inspect the contact sheet. If a pose has an extra paw or a different face, regenerate that pose using the approved reference. Cropping cannot repair incorrect artwork.
You now have eight independent static PNGs. Keep these full-quality originals even if you continue to animation.
Step 4: Animate one sticker in Seedance
Start with an easy motion, such as the bow in sticker 03. Upload its PNG to your chosen Seedance service using its image-to-video mode. ByteDance documents image inputs among Seedance’s supported inputs; the interface and duration options depend on the service you use.
For this workflow, prepare a copy of the PNG on a flat background color that is absent from the character and its props. Ask your coding assistant to make that copy without changing the artwork. Green may work for an orange Shiba; choose a different color for a green character.
The background will be removed after animation. Do not assume a downloaded video preserves the source PNG’s transparency.
Animate the attached office Shiba giving one gentle bow.
Begin in the reference pose, lower the head and shoulders slightly,
then return to the same pose for a smooth repeat.

Keep the face, fur markings, colors, and body proportions
consistent with the reference throughout the clip.
Keep the camera fixed and the character at a constant scale.
All body parts must stay within the frame.
Keep the supplied flat background color unchanged.
No text, new props, camera movement, scene cuts, or audio.
Choose a short available duration. The source video’s duration can differ from the final LINE animation; the export step will trim and retime it.
Watch the whole clip before making the other seven. Check the middle and ending, not just the opening image. Look for changing markings, extra limbs, zooming, clipped ears, or a background that changes color.
If it fails, simplify the action and retry that one sticker. Once the result is usable, save it as video/03.mp4. Repeat with the other actions, changing only the movement instructions. Name every video after its sticker ID so the files stay paired.
Optional: generate several animations together
TOYIFY’s workflow explores putting independent animations side by side in one wide video. It can improve how much usable material comes from a generation, but it also adds crop, timing, and resolution tradeoffs.
Try this after completing your first pack. Keep characters in separate regions, leave room for movement, and forbid interaction between them. Measure the cost per usable sticker—including retries—before deciding it is cheaper for your chosen service.
Step 5: Use a skill to handle the file work
A prompt describes the current job. A skill stores a reusable workflow, so your assistant can follow the same processing and checking instructions next time. OpenAI’s skill documentation describes the SKILL.md format and local skill locations.
We’ve included an original instruction-only starter skill for this guide. It tells a coding assistant how to inspect assets, process backgrounds, prepare exports, and report problems. It does not include a video generator or a prebuilt conversion engine; the assistant must implement and run the processing with tools available on your machine. It has not been validated end to end on a real generated sticker pack.
Download the starter skill ZIP · Read SKILL.md
For Codex, extract the prepare-line-stickers folder into .agents/skills/ inside your working project. Keep the directory structure below. Codex can then discover the skill; restart it if the new skill does not appear.
office-shiba/
  .agents/skills/prepare-line-stickers/SKILL.md
  plan.md
  character.png
  sheet.png
  refs/01.png ... 08.png
  video/01.mp4 ... 08.mp4
Run it with this request:
Use $prepare-line-stickers for this office-shiba project.
I have 8 approved static PNGs in refs/ and 8 videos in video/.
Prepare separate static and animated LINE submission folders.
Preserve the original assets.

Process sticker 03 first. Show its transparent animation
against both light and dark backgrounds before processing
the remaining seven. Flag problems instead of hiding them.
Give me a validation report and separate submission ZIPs.
Do not upload or submit anything to LINE.
If you use another coding assistant, give it the SKILL.md file and ask it to follow those instructions; its native skill-installation method may differ. It needs file access and code execution to produce real exports. A text response describing a ZIP is not a downloadable file.
What to check after processing
Look at the transparent animation on both backgrounds. A white fringe may disappear on white and become obvious on dark gray. Also inspect the character’s eyes, clothes, and props for accidental holes.
If the cutout is wrong, give the assistant a specific repair request:
The background removal damaged part of the character.
Compare the output with the source video and show the mask.
Preserve foreground colors even when they resemble the backdrop.
Use background connectivity where helpful, but inspect enclosed
background gaps separately. Keep soft edges and remove color spill.
Re-export only this sticker and show the before/after comparison.
Inspect motion as well as transparency. A clean cutout with a suddenly changing face still needs a better source video. Save successful processing scripts so the next pack can reuse them.
Step 6: Check the LINE export requirements
An MP4 or GIF preview is not the final animated LINE submission. Animated stickers use APNG files with a .png extension.
The following requirements were checked against the official LINE animated-sticker guidelines on September 7, 2026:
| Asset | Requirement |
|---|---|
| Animated stickers | 8, 16, or 24 APNG files |
| Sticker dimensions | Within 320 × 270 px; at least one dimension must be 270 px or greater |
| Main image | One 240 × 240 px APNG |
| Chat thumbnail | One 96 × 74 px static PNG |
| Background | Transparent |
| File size | At most 1 MB per image; submission ZIP at most 60 MB |
LINE also specifies 5–20 frames and whole-second playback options of 1, 2, 3, or 4 seconds, with total playback including loops no longer than 4 seconds. The first frame must communicate the sticker’s meaning because it is used when the animation is not playing. See the frame and loop guidance.
Ask the assistant to read those official pages before exporting and to report each file’s dimensions, frame count, timing, loops, transparency, and size. Renaming a video to .png does not convert it.
For a static pack, use the separate static-sticker guidelines. Keep static and animated submission files in different folders and ZIPs. Full-resolution source PNGs belong in your working assets, not automatically in a submission archive.
Step 7: Upload and review the pack in LINE Creators Market
Sign in to LINE Creators Market, register a new sticker item, and select the appropriate static or animated type. Enter the requested listing details, set the sticker count, and upload the corresponding images or ZIP through the image-upload area.
Review the upload preview before requesting review. Confirm that the order matches your plan, every animation plays, the thumbnail looks clear, and the first frame communicates each reaction. Complete the current creation-method and rights declarations accurately, following the fields shown in your account.
If LINE reports an upload error, save the exact message and the affected filename. Give both to your coding assistant along with the validation report. Fix and recheck the affected export before uploading it again. Technical checks help prepare the files; acceptance still depends on LINE’s review.
Common problems and what to change
| Problem | Next action |
|---|---|
| The character changes between stickers | Reuse the approved reference and regenerate only the inconsistent poses. |
| Ears, paws, or props are cut off | Inspect the crop boundaries and allow space for the entire motion. |
| A checkerboard remains visible | Check the alpha channel; the pattern may be painted into the image. |
| The face changes halfway through an animation | Simplify the movement and regenerate that source video. |
| The cutout has a colored fringe or holes | Inspect the mask against light and dark backgrounds, then adjust it. |
| The file is too large | Reduce unnecessary motion and color complexity, then recheck frames and timing after compression. |
| The sticker looks blank when it stops | Choose a meaningful first frame and validate the export again. |
Want the sticker pack without setting up the workflow?
Once you’ve made a pack this way, you have a process you can reuse—and plenty of control over each stage. You also have references, prompts, videos, masks, and exports to manage every time you change the character.
CubiZoo brings those steps together. Upload your photo and describe the pack you want. CubiZoo handles the set creation and transparent animations, with built-in support for static and animated LINE versions.
For the office Shiba example, your request can be as simple as:
Turn my Shiba into eight funny office reactions: good morning, got it, thank you, working on it, need a break, sorry, we did it, and good night. No text.
You choose the photo and the idea. CubiZoo takes care of making the pack; LINE submission and review remain a separate step.
Make your sticker pack with CubiZoo →
Further reading and credits
This guide combines a practical example with lessons shared by other creators. Its prompts and starter skill were written for this article; they are not copies of the creators’ paid materials.
- Miyama: choosing a subject people want to use. The public introduction informed the planning approach; the paid prompts and skill were not accessed.
- Mato: from AI artwork to animated LINE submission. Useful production lessons; check numerical requirements against LINE’s current documentation.
- DAAI: batch animation and reusable processing workflows. Its GIF workflow has a different output target from LINE APNG submission.
- TOYIFY: using a wider frame for multiple animations.
- Hoko’s alternative-model example and IHayato’s generation-cost discussion. Treat reported prices and promotions as dated examples, not a budget guarantee.